Grid object
The Grid object allows you to read/write data in a tabular format from the data source configured in the object.
To draw one, do the following:
- On the Graphics tab of the ribbon, in the Data Objects group, click Grid.
- Click on the screen worksheet, and then draw a box of the desired size (while holding down the mouse button).
- Release the mouse button, and the Grid Object will display.
Figure 1. Sample Grid Object

Note: This object cannot be moved behind active objects or shapes on a project screen. In other words, it must always be in front. For more information, see Bring to front / Send to back.
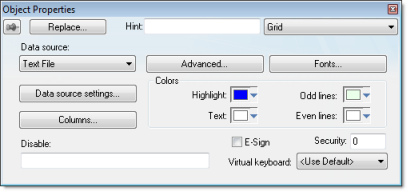
Right-click on the Grid Object, and select Properties from the menu. The Object Properties dialog will open. Use this dialog to configure the Grid Object’s parameters:
Figure 2. Object Properties: Grid


- Data Source: Select the data source type. The object supports three data sources:
Data Source Description Text File Displays data from a text file in the ASCII or Unicode format (e.g., CSV text files). Class Tag Displays values from a Class Tag, where the members of the tag are fields (columns) of the grid object, and each array position is one row of the grid object. Database Displays data from an SQL Relational Database, using ADO (ActiveX Database Object) to exchange data with the database. - Data source settings: Click to launch the Data dialog, where you can specify a data source for the Grid object.
- Columns: Click to launch the Columns dialog, where you can configure the settings (such as label, column, width, etc.) for the columns of the Grid object.
- Advanced: Click to launch the Advanced dialog, where you can configure several settings for the Grid object.
- Fonts: Click to launch the Fonts dialog, where you can configure the font settings for the text displayed in the Grid object.
Tip: By default, the same text color is used for both the header and the body of the grid. If you want to set a different text color for the header, then manually edit the project file (projectname.APP) to add the following setting:
[Objects] GridHeaderTextColor=value
value must be a hexadecimal RGB color value, such as FF0000 for red. Please note that this setting will apply to all grid headers in your project.
- Highlight: Select a background color for the selected row, during runtime.
- Text: Select a text color for the selected row, during runtime.
- Odd lines: Select a background color for the odd rows.
- Even lines: Select a background color for the even rows.
- Disable: You can enter an expression in this field to disable data input or action by the user.
- E-Sign: When you check this option, the user will be prompted to enter an electronic signature before entering or modifying data on the object.
- Security: Enter the security system access level required for the object/animation.
- Virtual keyboard: Select a Virtual Keyboard type used for this object. The option <Use Default> selects the default Virtual Keyboard configured in the Viewer settings (Viewer on the Project tab of the ribbon). You can also specify a different Virtual Keyboard for this Grid object.