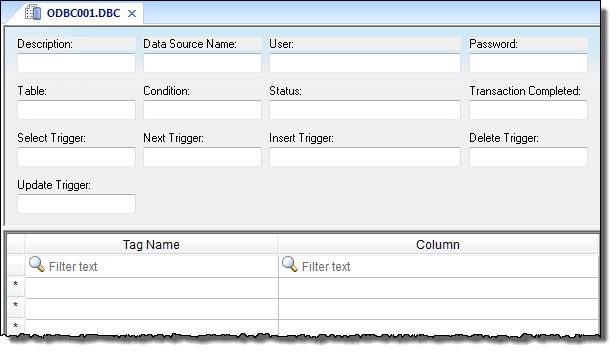
ODBC worksheet
The ODBC interface runs in a network environment and uses the standard Windows ODBC configuration. The ODBC task is capable of data interchange between IWS and any database supporting this interface.
Also, the ODBC interface is not available for projects running on Windows Embedded target systems.
- On the Insert tab of the ribbon, in the Task Worksheets group, click ODBC;
- Right-click the ODBC folder in the Project Explorer, and then click Insert on the shortcut menu; or
- Click New on the Application menu, click the File tab, and then select ODBC Worksheet.
To edit an existing ODBC worksheet, double-click it in the Project Explorer.

ODBC worksheets are executed under the ODBC Runtime task. However, creating a new worksheet does not automatically enable the task; you must use the Execution Tasks dialog (Tasks on the Home tab of the ribbon) to configure the task to start at runtime. For more information, please see Execution Tasks.
- Header area (top section), which contains information for the whole group, defines tags to start read and write events, sets return values, handles database access parameters, and so forth; and
- Body area (bottom section), where you define each tag in the group and relate tags to fields in the current register from the database table.
- Description field: Type a description of the worksheet for documentation purposes.
- Data Source Name field: Type the same Data Source Name (DNS) specified in the Windows Control Panel containing information about specific database access.
- User field: Type a user name to access to the database.
- Password field: Type the user’s password.
- Table field: Type a table name in the database.
- Condition field: Type a search condition or filter.
- Status field: Type a return value (fill in with a tag name). The tag should report 0 for success and use another value for an error code.
- Transaction Completed field: Type a tag that changes value when the transaction is executed.
- Select, Next, Insert, Delete, or Update Trigger fields: Type a tag to work as a trigger, where each value change causes the system to execute the corresponding command. At least one trigger field is required.
- Tag Name field: Type the names of tags to update with file contents or tags whose values should be written to a file.
- Column: Type the location in which to find data in the file (for example, R3CH corresponds to Row 3, Column H of an Excel sheet)
- Click the Start > Settings > Control Panel.
- When the Control Panel window displays, double-click on the ODBC icon to open the ODBC Data Source Administrator dialog.
- In the ODBC Data Source Administrator dialog, click Excel Files in the User Data Sources list, and then click the Configure button.
- When the ODBC Microsoft Excel Setup dialog displays, type the Windows configuration name to be used in the DSN field on ODBC worksheet into the Data Source Name field.
- Click the Select Workbook button to configure the Excel file you want to use.
- Return to the ODBC Data Source Administrator dialog and verify that your User DSN displays in the list. Click OK to close the dialog.
- After configuring the ODBC Windows interface, you must configure the project’s ODBC worksheets.
- From the Tasks tab, insert a new ODBC worksheet.
- Be sure you set the ODBC Runtime to start automatically using the Execution Tasks dialog (Tasks on the Home tab of the ribbon).
To start this configuration, you simply need to run the project. Your project will handle the Select, Next, Insert, Delete, and Update triggers to allow data to exchange throughout rows in Excel and tags configured in the worksheet.
Consult your Windows documentation for the meaning of specific error codes.
- Select command
- 1 – Error in the ODBCPREPARE function.
- 2 – Error in the ODBCBINDCOL function.
- 3 – Error in the ODBCEXECUTE function.
- 4 – Error in the ODBCSETCH function.
- Next command
- 5 – Error in the ODBCSETCH function.
- Insert command
- 6 – Error in the ODBCPREPARE function.
- 7 – Error in the ODBCEXECUTE function.
- 8 – Error in the ODBCCOMMITE function.
- Update command
- 9 – Error in the ODBCPREPARE function.
- 10 – Error in the ODBCEXECUTE function.
- 11 – Error in the ODBCCOMMITE function.
- Delete command
- 12 – Error in the ODBCPREPARE function.
- 13 – Error in the ODBCEXECUTE function.
- 14 – Error in the ODBCCOMMITE function.