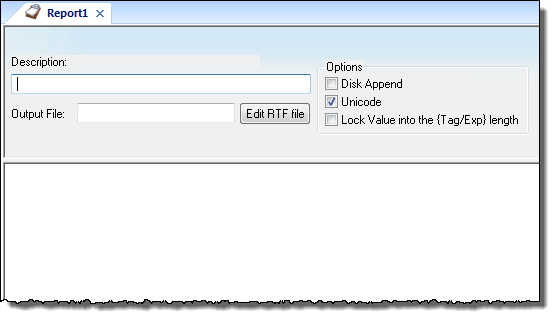
Report worksheet
A Report worksheet is used to design a report that is dynamically generated during runtime (using the current values of the included tags) and then either sent to a printer or saved to a file.
- On the Insert tab of the ribbon, in the Task Worksheets group, click Report;
- Right-click the Reports folder in the Project Explorer, and then click Insert on the shortcut menu; or
- Click New on the Application menu, click the File tab, and then select Report Worksheet.
To edit an existing Report worksheet, double-click it in the Project Explorer.

- Header area (top section), which contains information for the whole group; and
- Body area (bottom section), where you define each tag in the group.
- Description field: Type a description of the worksheet for documentation purposes.
- Output File field: Type a tag name for the output file (using the {tag} syntax) where data is stored when you are printing to a file. Where the tag value is part of the file name.
For example: report{Day}.out. Where the generated file might be report1.out, report2.out, report3.out, and so on, according to the tag day value.
Note: A report configuration file uses .RCP as the default extension. The Output File field is the file where data is stored. - Edit RTF file button: Click to access the report as an RTF file, which you can edit for layout modification and so forth.
- Disk Append checkbox: When printing to a file
- Check the box to add (amend) the new report to the end of an existing file
- Uncheck the box to replace the existing report in that file with the new report
- Unicode checkbox: Click (enable) to save the report in Unicode format (two bytes per character) or (disable) to save the report in ASCII format (one byte per character).
- Lock Value into the {Tag/Exp} length checkbox: Click (enable) to automatically truncate the values of Tags/Expressions in the report to fit between the curly brackets, as they are positioned in the Body of the report (see below). This helps to preserve the layout of the report. If this option is left unchecked, then the full values of Tags/Expressions in the report will be displayed.
Use the Body portion of this worksheet for report formatting. You can configure a report using data in the system and indicating where to print the tag values. Each tag name will replace the {tag_name} tag name. For Real type tags, use the following syntax: {tag_name n}, where n is the number of decimal places you want printed.
To execute a Report worksheet, use the Report function anywhere an expression is allowed.