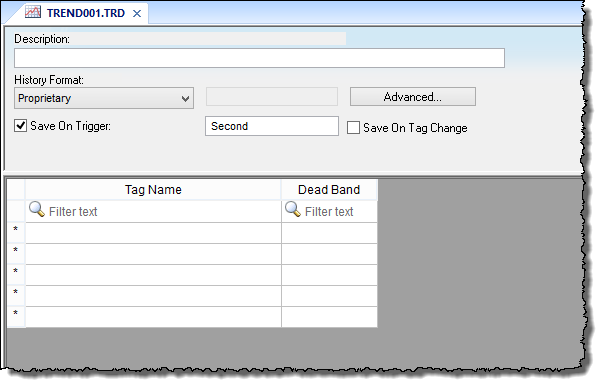
Trend worksheet
The Trend folder enables you to configure history groups that store trend curves. You can use the Trend worksheet to declare which tags must have their values stored on disk, and to create history files for trend graphs. The project stores the samples in a binary history file (*.hst), and shows both history and on-line samples in a screen trend graph.
The Trend worksheet is executed by the Background Task module (see Execution Tasks). It handles the saving of trend data to the history, but it does not display that data to the operator; the Trend Control screen object, available on the Graphics tab of the ribbon, must be created and configured in a screen in order to display trend data.
- On the Insert tab of the ribbon, in the Task Worksheets group, click Trend;
- Right-click the Trends folder in the Project Explorer, and then click Insert on the shortcut menu; or
- Click New on the Application menu, click the File tab, and then select Trend Worksheet.
To edit an existing Trend worksheet, double-click it in the Project Explorer.

- Header area (top section), which contains information for the entire group
- Body area (bottom section), where you define each project tag in the group. This section contains several columns (only two are shown in the preceding figure).
Header
- Description
- Type a description of the worksheet for documentation purposes.
- History Format
- Click the arrow button to select a trend history format from the list. The available options are:
- Proprietary
- Save trend history in a proprietary, binary file. The file is saved in your project folder (on the project runtime server) at: […]projectnameHstGGYYMMDD.hst
- GG = Trend worksheet number
- YY = Last two digits of the year
- MM = Month
- DD = Day
A new history file is created for each calendar day that the project runs.
The utility programs HST2TXT.EXE and TXT2HST.EXE are provided in order to convert history files from binary ( *.hst ) to plain text ( *.txt ) and vice versa. For more information, see Converting Trend History Files from Binary to Text and Converting Trend History Files from Text to Binary.
- Database
- Save trend history in an external SQL database of your choice. After you select this format, click Database Configuration to open the Database Configuration dialog box, where you can configure the connection to the database. For more information, see Database Configuration and Database Interface.
By default, the history is saved in the table TRENDGGG ( GGG = Trend Worksheet Number; e.g., TREND001 for the Trend Worksheet 001).
- Wonderware Historian
- Save trend history in a Wonderware Historian database of your choice. After you select this format, click Historian Configuration to open the Wonderware Historian dialog box, where you can configure the connection to the database. For more information, see Connect to a Wonderware Historian database.
The trend history for each project tag is saved separately in the Historian database, but you can use Prefix in the connection settings in order to keep the tags grouped together.
Note: You can specify String tags in many fields of the Trend worksheet, to change those values during run time, but doing so may affect how those values are saved in the trend history:- When the history format is Proprietary, the value of the String tag is converted to a numerical value (if possible) and then saved in the history file. If numeric conversion is not possible, then a value of 0 is saved.
- When the history format is Database or Wonderware Historian, the actual value of the String tag is saved in the database.
- Save On Trigger
- Click (enable) and type a tag name to save trend samples when someone changes the specified tag. (Tag change can be an event from the Scheduler.)
- Save On Tag Change
- Click (enable) to always save the trend sample when a value change occurs in any of the tags from that group.
- Advanced
- Click to display the Trend Advanced Settings dialog. For information about completing the fields in this window, see Batch History Configuration.
Body
- Tag Name
- The name of the project tag for which trend history will be saved.
- Dead Band
- Type a value to filter acceptable changes when Save on Tag Change is used. For example, Dead Band has value = 5. If the tag value is 50 and changes to 52, the system will not register this variation in the database, because it is less than 5. If the change is equal to or greater than 5, the new value will be saved to the history file.
- Field
- When History Format is Database, this is the name of the field (in the SQL database table) where the trend history will be saved. If this field is left blank, the project tag name will be used.
For array tags and classes, special characters ([ ] .) will be replaced by underscores (_), as shown in the examples below:
Tag Name Field Name MyArray[1] MyArray_1 MyClass.Member1 MyClass_Member1 MyClass[3].Member2 MyClass_3_Member2 - Historian Tag
- When History Format is Wonderware Historian, this is the name of the tag (in the Historian database) where the trend history will be saved. If this field is left blank, the project tag name will be used.