Saving your alarm history / event log to an external database
By default, your project’s alarm history and event log are saved to proprietary-format text files in your project’s Alarms folder. However, you can change your project settings to save them to an external SQL database instead.
Note: If your project was created with InduSoft Web Studio v7.1+SP1 or earlier and then upgraded to the current version, you should consider starting over with new database tables.
Beginning with InduSoft Web Studio v7.1+SP2, new database tables are automatically indexed by event time in order to improve runtime performance. Existing database tables cannot be indexed in this way, so if you can afford to discard that data, you should change your database configuration to create new tables.
If you do this, you must also manually edit your project file (projectname.APP) to add the following setting:
[Alarm] AddEventTimeColumn=1
The setting exists for backward compatibility, and it defaults to 0 for projects that were upgraded from earlier versions.
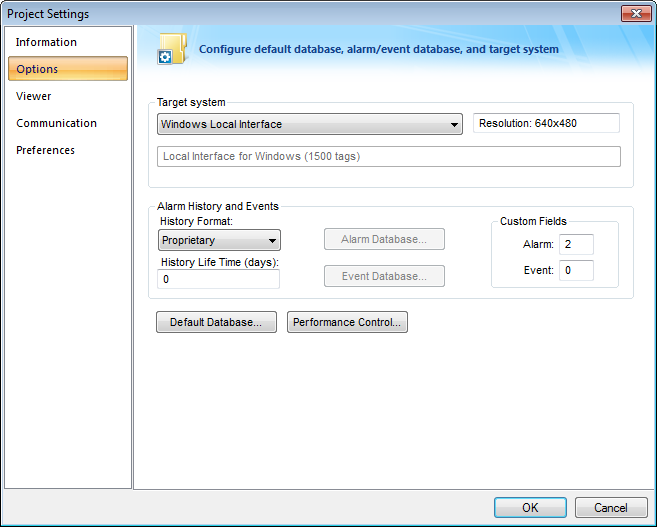
- On the Project tab of the ribbon, in the Settings group, click Options. The Project Settings dialog is displayed.
Figure 1. Project Settings: Options

- In the Alarm History and Events area, in the History Life Time box, type the number of days of history that you want to save. As the history exceeds the specified number of days, it will be automatically deleted in a first-in, first-out manner. If no number is specified — that is, if it is left blank or set to 0 — then history will never be deleted. There is no limit to how much history you can save, but the more you save, the more disk space it will take.
- From the History Format list, select Database.
- To configure a single, default database to be used for both the alarm history and the event log (as well as all other runtime tasks), in the Default Database area, click Configure. The Default Database Configuration dialog is displayed. Use the dialog to configure the database connection. For more information, see Configuring a default database for all task history.
- To configure a separate database for either your event log or your alarm history, click Event Database or Alarm Database, respectively. In either case, a Database Configuration dialog is displayed. Use the dialog to configure the database connection. For more information, see Database Configuration.
- Click OK.