About security access levels
Almost every item in a project — screen object, object animation, project screen, task worksheet — can be assigned a security access level. That access level determines which user groups can edit the item during development and/or use the item during runtime.
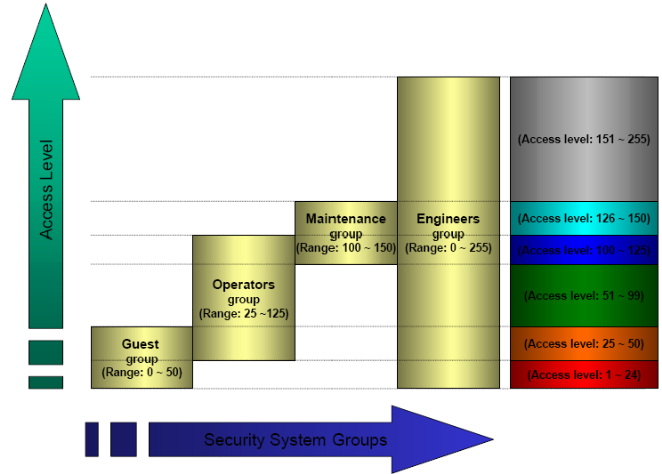
There are 255 possible access levels, allowing a large amount of granularity. Each user group is configured with ranges of levels for both development and runtime, and the groups’ ranges may overlap.
Figure 1. Example of security access levels


This means that for a user to be able to edit and/or use an item, the item’s access level must fall within the range specified for that user’s group.
For example, UserA of GroupA has a security access level range of 1-10 and UserB of GroupB has a security access level range of 5-15. To continue the example:
- Item #1 has Access Level = 1
- Item #2 has Access Level = 7
- Item #3 has Access Level = 12
- Item #4 has Access Level = 20
Consequently,
- Only UserA can access Item #1
- Both users can access Item #2
- Only UserB can access Item #3
- Neither user can access Item #4
Note: The default access level for all items is 0, and all users can use all items at that level.
Setting access levels for different types of items
For project screens, the access level can be set in the Screen Attributes dialog.
Figure 2. Security (access level) setting in Screen Attributes dialog


For screen objects and object animations, the access level can be set in the individual Object Properties dialog. (If the option is not available in the main dialog, then it should be available in one of the sub-dialogs.)
Figure 3. Security (access level) setting in Object Properties dialog


For task worksheets, do the following:
- Open the worksheet for editing.
- Click anywhere in the body of the worksheet. The Access Level control, on the Project tab of the ribbon, is enabled.
- Click Access Level. The Security dialog is displayed.
Figure 4. Security dialog

- In the Access Level box, type an access level for editing the worksheet.
- Click OK.