Group Account dialog
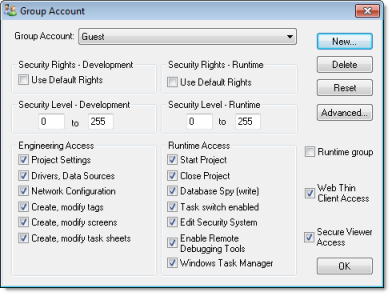
The Group Account dialog is used to create and delete user groups, as well as to configure the access privileges for a selected group.
Accessing the dialog
- Open the Security System dialog, and then click Groups; or
- In the Global tab of the Project Explorer, right-click Groups and then click Groups properties on the shortcut menu.
The dialog in detail
- The settings in the Group Account dialog below are permissive — that is, the most permissive setting from all of a user’s groups applies to the user. For example, if any of the groups can create and modify tags, then the user can create and modify tags.
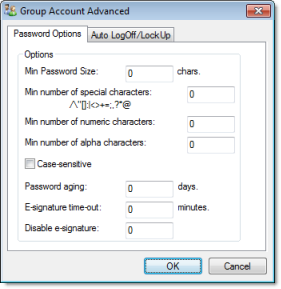
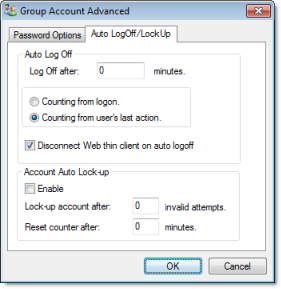
- The settings in the Group Account Advanced dialog (both tabs) are restrictive — that is, the most restrictive setting from all of a user’s groups applies to the user. For example, if one group has a minimum password size of 8 and another group has a minimum password size of 12, then the user’s minimum password size is 12. (For Auto Log Off in particular, Counting from logon overrides Counting from user’s last action.)

| Area / Element | Description | |
|---|---|---|
| Group Account | The user group that you are currently configuring.
Note: There are two default groups for all projects: Guest and (Default Rights).
Note: If the security mode is set to Domain (LDAP), then please note that the built-in groups in Microsoft Active Directory will not appear in this list of groups and cannot be added to the project.
| |
| New | Creates a new group. In the New Group Account dialog, type the name of the new group and then click OK. | |
| Delete | Deletes the currently selected group. | |
| Reset | Resets the privileges of the currently selected group to match the (Default Rights) group.
This does not lock the group to the default; you can make further changes. To lock the group, see Use Default Rights below. | |
| Advanced | Opens the Group Account Advanced dialog (see below). | |
| Security Rights – Development | Use Default Rights | Locks the development privileges of the currently selected group to those configured for the (Default Rights) group. If changes are made to the (Default Rights) group, then they also apply to this group. |
| Security Level – Development | Range | The range of access levels that this group may access in the development application. |
| Engineering Access | Project Settings | Members of the group may modify the project settings and the Mobile Access configuration . |
| Drivers, Data Sources | Members of the group may create, modify device drivers and external data sources. | |
| Network Configuration | Members of the group may create, modify TCP/IP Client worksheets. | |
| Create, modify tags | Members of the group may create, modify project tags. | |
| Create, modify screens | Members of the group may create, modify project screens. | |
| Create, modify task sheets | Members of the group may create, modify task worksheets. | |
| Security Rights – Runtime | Use Default Rights | Locks the run-time privileges of the currently selected group to those configured for the (Default Rights) group. If changes are made to the (Default Rights) group, then they also apply to this group. |
| Security Level – Runtime | Range | The range of access levels that this group may access in the project. |
| Runtime Access | Start Project | Members of the group may run the project. |
| Close Project | Members of the group may stop the project. | |
| Database Spy (write) | Members of the group may write values to the project database using the Database Spy window.
Note: This only applies to projects running locally. For projects running remotely, see Enable Remote Debugging Tools below.
| |
| Task switch enabled | Members of the group may switch away from the project runtime client to another Windows task.
This option does not apply to Secure Viewer thin clients running on Windows XP 64-bit or any version of Windows Embedded; the user may always switch away from the client. | |
| Edit Security System | Members of the group may make changes to the project security system during run time.
Note: Be careful not to clear this option for your own group, or you may not be able to undo your own changes.
| |
| Enable Remote Debugging Tools | Members of the group may use Remote Database Spy and Remote LogWin. | |
| Windows Task Manager | Members of the group may open the Windows Task Manager.
This option does not apply to Secure Viewer thin clients running on Windows XP 64-bit or any version of Windows Embedded; the user may always open the Windows Task Manager. Note: Clearing this option means disabling the Task Manager during run time, which requires Administrator privileges. You will need to run the client with elevated privileges.
| |
| Runtime group | If this option is selected, then the group can only include users that have the option Runtime user selected. For more information, see Creating and configuring users. | |
| Web Thin Client Access | Members of the group may use a web thin client to connect to the project runtime server.
Note: This option has no effect on the members’ ability to use Mobile Access.
| |
| Secure Viewer Access | Members of the group may use a Secure Viewer thin client to connect to the project runtime server. | |

| Area / Element | Description |
|---|---|
| Min password size | To make user passwords more complex and therefore more secure, you can require that they contain a certain number of alpha (A-Z, a-z), numeric (0-9), and special (punctuation) characters. When the user is prompted to change his password — for example, when his old password expires (see Password aging below) — the new password will not be accepted unless it meets these requirements. |
| Min number of special characters | |
| Min number of numeric characters | |
| Min number of alpha characters | |
| Case-sensitive | If this option is selected, then passwords are case sensitive — that is, passwords created with both upper and lowercase characters must be entered the same way by the user.
Note: In projects created with InduSoft Web Studio v6.1+SP2 through v6.1+SP6, all passwords were case sensitive.
|
| Password aging | Longevity (in days) of the password for all users in this group. After the specified number of days, the project will force the user to change his password: when the user tries to log in, the Change Password dialog is automatically displayed and the user cannot complete the logon process until he provides a new password.
By default, the user must choose a new password that is different from the old password. To change this so that the user can re-use the same password, manually edit the project file (project_name.app) to include the following setting:
[Security] ChangePasswordMode=1 To make passwords never expire, set Password aging to 0. |
| E-signature time-out | Timeout period (in minutes) of the E-sign prompt for all users in this group. The user must enter his user name and password before the specified timeout to use project features that require an e-signature. |
| Disable e-signature | When the value in this box is TRUE (non-zero), users in this group cannot use any project features that require an e-signature.
You can configure a project tag in this box, so that e-signature is dynamically enabled/disabled during run time. |

| Area / Element | Description | |
|---|---|---|
| Auto Log Off | Log Off after | Number of minutes after which the current user must be logged off automatically. If this field is left in blank (or with the value 0), the current user is never logged off automatically. |
| Counting from logon | When this option is selected, the current user is automatically logged off after the period of time configured in the Log Off after field elapsed since when the current user was logged on the system. | |
| Counting from user’s last action | When this option is selected, the current user is automatically logged off after the period of time configured in the Log Off after field elapsed since the last action (mouse, touchscreen, or keyboard action) was performed by the current user. | |
| Disconnect Web Thin Client on auto logoff | If the user logged on through a Web Thin Client, then when the user is logged off, the client is automatically disconnected from the data server. | |
| Auto Lock-up | Enable | Enables the auto lock-up features described below. |
| Lock up account after | Maximum number of times a user can try to log on to an account. If the user exceeds the specified maximum number of attempts (provides an invalid password) within the period of time specified in the Reset counter after field, the project will automatically block the user. | |
| Reset counter after | Defines how long after an invalid log-on attempt the project will wait (in minutes) until it resets the log-on attempts counter. | |