Command animation
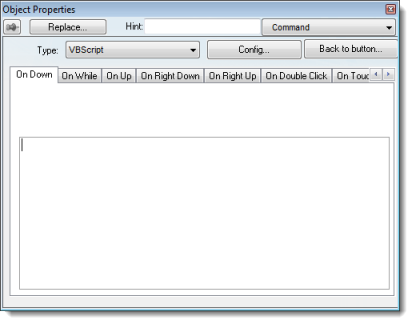
On the Graphics tab, in the Animations group, click Command to add the animation to a selected object or group of objects. The animation enables you to click on the object or press a pre-defined key to execute the command at runtime. Double-click on the object to view its object properties.

- On Down: Executes the command/script once when the user clicks on the object with the left mouse button.
- On While: Keeps executing the command/script continuously while the mouse pointer is pressed on the object. The period (in milliseconds) of execution for the command/script is set in the Rate field from the Configuration dialog screen, except for the VBScript option, which is executed as fast as possible.
- On Up: Executes the command/script once when the user releases the left mouse button on the object.
- On Right Down: Executes the command/script once when the user clicks on the object with the right mouse button.
- On Right Up: Executes the command/script once when the user releases the right mouse button on the object.
- On Double Click: Executes the command/script once when the user double-clicks on the object with the left mouse button.
- On Touch, On Touch Start, On Touch Delta, On Touch Complete: These events are used for multi-touch gestures. For more information, see About Touch Events.
| Type | Description |
|---|---|
| Built‑in Language | Allows you to configure a script using the IWS built-in language. When this type is selected, the user can configure up to 12 expressions for each event in the Expression column. The expressions are executed sequentially from the first row until the last one when the event is triggered. The result of each expression is written to the tag configured in the Tag column (if any). Consult the Built-in Scripting Language chapter for more information. |
| VBScript | Allows you to configure a script using the standard VBScript language. When this type is selected, the user can configure a script in the VBScript editor for the Command animation. Consult the VBScript chapter for further information about the VBScript language. |
| Open Screen | Allows you to configure the Command animation to open a specific screen when the event is triggered during runtime. This type is equivalent to the Open function. You can either type the screen name in the Open Screen field or browse it. Furthermore, you can type a string tag between curly brackets {TagName} in this field. When the event is executed, the project will attempt to open the named screen. |
| Close Screen | Allows you to configure the Command animation to close a specific screen when the event is triggered during runtime. This type is equivalent to the Close function. You can either type the screen name in the Close Screen field or browse it. You can also type a string tag between curly brackets {TagName} in this field. When the event is executed, the project will attempt to close the named screen. |
| Set Tag | Allows you to configure the Command animation to set a tag when the event is triggered during runtime. You can either type the tag name in the Set Tag field or browse it. When the event is executed, the project will write the value 1 to the tag configured in this field. |
| Reset Tag | Allows you to configure the Command animation to reset a tag when the event is triggered during runtime. You can either type the tag name in the Reset Tag field or browse it. When the event is executed, the project will write the value 0 to the tag configured in this field. |
| Toggle Tag | Allows you to configure the Command animation to toggle a tag when the event is triggered during runtime. You can either type the tag name in the Toggle Tag field or browse it. When the event is executed, the project will toggle the value of the tag configured in this field. |
Config button: Launches the Configuration dialog, where the Command animation can be fully configured.
Back to button: Click to go back to the object properties of the underlying Button object.
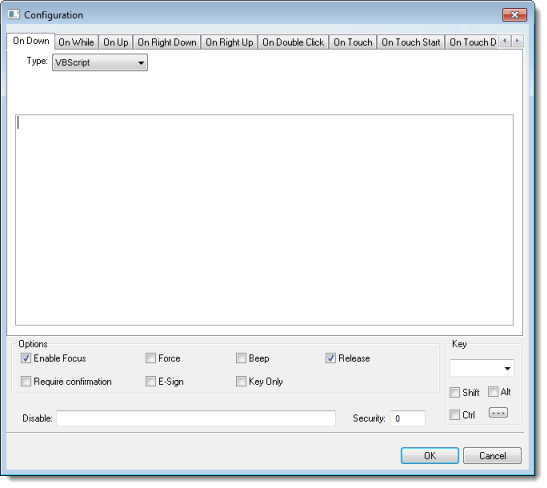
Configuration dialog
This dialog allows you to fully configure the Command animation…

The event tabs (e.g., On Down, On While, etc.) and the Type menu are the same as in the Object Properties dialog described above. The remaining settings are shared for all events:
- Options pane:
- Enable Focus checkbox: When this option is checked, the object that the Command animation was applied to can receive the focus during runtime by the navigation keys.
- Force checkbox: When this option is selected, any project tag that receives a value will trigger events as if the tag changed, even if the new value is equal to the old value. For example, if a tag has a value of 0 and the Command animation runs a procedure that writes 0 to that tag, all other tasks in the project runtime will recognize that the tag changed, even though it did not. This option is useful for making sure that events triggered by tag changes (e.g., Write on Tag Change on a communication driver) are always triggered when the Command animation is used.
Please keep in mind that if the tag’s value does not actually change, the tag’s timestamp (tagname->Timestamp) is not updated either.
Force applies to both the procedure run by the Command animation itself and any global procedures called in that procedure, as long as they are run on the project runtime client where the Command animation is used (i.e., on the device where the button is pushed).
Force does not apply to global procedures that are run on the project runtime server using the function RunGlobalProcedureOnServer, even if the function is called in the procedure run by the Command animation. If you want to force tag changes in global procedures run on the server, use the function ForceTagChange.
Note: For projects created with InduSoft Web Studio v6.1+SP3 or earlier, Force is enabled by default and cannot be disabled. - Beep checkbox: When this option is checked, a short beep is played when the Command is executed. This option is useful to provide an audio feed-back to the user, indicating that the Command was executed. It does not indicate, however, if the action triggered by the Command animation was successful or not.
- Release checkbox: When this option is checked, the On Up event is executed when you drag the cursor (or your finger) out of the object area (whether the button was released or not). This option is useful to make sure that the On Up event will always be executed after an On Down event, even if the user releases the mouse cursor out of the object area before releasing it.
- Confirm checkbox: When this option is checked, user will have to answer a confirmation question before executing the command. This option is useful for decreasing the accidental triggering of critical events during runtime.
- E-Sign checkbox: When this option is checked, the user will be prompted to enter the Electronic Signature before executing the command.
- Key Only checkbox: When this option is checked, the user can only use the keyboard shortcut (configured in the Key pane described below) to execute commands.
- Disable: Disables action by the user when the result of the expression configured in this field is TRUE (value different from 0).
- Security: Security access level required to use the Command animation.
- Key group: Shortcut used to trigger the events On Down, While Down and On Up using a keyboard. (In other words, pressing this keyboard shortcut is the same as clicking the left mouse button.) This option is especially useful when creating projects for runtime devices that do not provide a mouse or touch-screen interface — the keyboard is the only physical interface available to interact with your project during runtime.
- Shift, Ctrl, or Alt boxes: Click to create a key combination key, meaning the Shift, Ctrl and/or Alt key must be pressed with the key specified in the drop-down list.
- Click the browse button (…) to open the Key Modifer dialog, which enables you to modify your combination keys. You can choose Left, Right or Left or Right to specify the position on the keyboard of the Shift, Ctrl or Alt key in the key combination. If you choose Left or Right, the command will be executed any time either of these keys is pressed in combination with the key specified in the drop-down list.
Tip: If you have defined custom keys for your project, you can select them in this list. For more information, see Define custom keys for selected screen objects.