Bring to front / Send to back
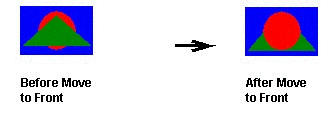
Bring a screen object to the front or send it to the back of other overlapping objects, as part of arranging the objects on the project screen.
Before you begin this task, you must have a project screen open for editing and the screen must have two or more objects already on it.
Screen objects are automatically assigned ID numbers, starting with ID 0, as you add the objects to a project screen. (To check the ID number of an object, simply select it. The ID number is displayed on the status bar at the bottom of the development application window.) The object with ID 0 is the furthest back, behind all other objects on the screen, and each additional object is displayed in front of it.
In other words, objects with higher ID numbers are displayed in front of objects with lower ID numbers.


When you rearrange objects, their ID numbers are automatically adjusted to reflect their new order. For example, if you have four objects on a screen and you send the frontmost object (ID 3) to the back, then that object becomes ID 0 and the ID numbers of the other three objects are increased accordingly.
Please note that windowed objects — that is, screen objects that include some kind of window displaying other data — are handled differently than shapes (e.g., Line, Rectangle) and simple active objects (e.g., Button, Check Box). The windowed objects on a screen will always be in front; you cannot send them behind the other types of objects. This is to ensure that the windowed objects will be rendered properly during project run time.
- Text Box object
- Combo Box object
- Alarm/Event Control object
- Trend Control object
- Grid object
- Most ActiveX and .Net Control objects
If you have more than one windowed object on the same screen, then you can arrange those objects relative to each other. For example, you can send a Grid object behind a Trend Control object. Both windowed objects will still be in front of the other types of objects, however, and in most cases, you should not have overlapping windowed objects anyhow.
To bring a screen object to the front or send it to the back:
- Select the screen object that you want to move forward or backward. “Handles” are displayed at the object’s corners to show that it is selected.
- To bring the object all the way to the front (i.e., increase it to the highest ID number), do one of the following:
- On the Format tab of the ribbon, in the Arrange group, click Bring to Front; or
- Right-click the object itself, and then click Bring to Front on the shortcut menu.
- To bring the object one layer forward (i.e., to increase its ID number by 1), do one of the following:
- On the Format tab of the ribbon, in the Arrange group, click and hold Bring to Front until the shortcut menu appears, and then click Bring Forward on the shortcut menu; or
- Right-click the object itself, and then click Bring Forward on the shortcut menu.
- To send the object all the way to the back (i.e., decrease it to ID 0), do one of the following:
- On the Format tab of the ribbon, in the Arrange group, click Send to Back; or
- Right-click the object itself, and then click Send to Back on the shortcut menu.
- To send the object one layer backward (i.e., to decrease its ID number by 1), do one of the following:
- On the Format tab of the ribbon, in the Arrange group, click and hold Send to Back until the shortcut menu appears, and then click Send Backward on the shortcut menu; or
- Right-click the object itself, and then click Send Backward on the shortcut menu.