ActiveX Control object
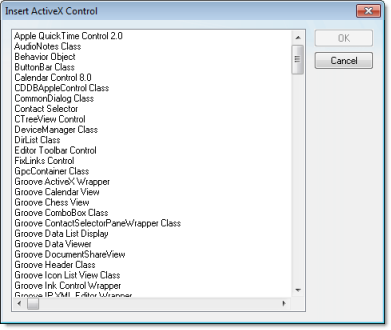
On the Graphics tab, in the Libraries group, click ActiveX Control to open the Insert ActiveX Control dialog, which you can use to place ActiveX components on your screen.
[UsedControls] EnableDownload=1 Count=number of controls [UsedControl1] CLSID=class ID of the ActiveX control Version=version of the ActiveX control Codebase=URL of the ActiveX control file, or of the .CAB file that contains the ActiveX control files RegFile1=name of a specific .OCX or .DLL file within the .CAB file; see below RegFilen=name of a specific .OCX or .DLL file within the .CAB file; see below … [UsedControln] …
The CLSID and Version settings are required for each ActiveX control, and they must match the ID and version of the actual control file(s) to which Codebase links. This allows a runtime station to check the control against those that are already registered. If the settings do not match, then the runtime station may unnecessarily download the same control again.
If you don’t know the CLSID and Version settings for an ActiveX control, you can find them in the registry key of an already installed and registered control. Search for the control file in HKEY_CLASSES_ROOTCSLID in the Windows Registry.
Codebase=http://server_address/AddOns/IndDateTimePick.ocx
Codebase=AddOns/IndDateTimePick.ocx
Finally, the Regfile settings are required only if Codebase links to a .CAB file. If it does, then use one or more Regfile settings to name the specific files within the .CAB file that must be downloaded and registered.
- Properties: Variables whose values can be read and/or written for your project (e.g., Object Color, FileName, URL, and so forth)
- Methods: Functions from the ActiveX object that can be triggered by your project (e.g., open a dialog, execute a calculation, and so forth)
- Events: Internal messages that can trigger the execution of expressions in your project (e.g., Mouse_Click, Download_Completed, and so forth)
The name of the properties, methods and events supported by each ActiveX depends on its own implementation.
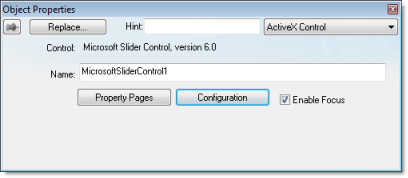
The Object Properties window displays the name of the ActiveX control. Generally, each ActiveX control is either a *.dll or a *.ocx file registered in your local computer. You must assign a name (alias) to the ActiveX control on the Name field (e.g., MyControl). This name is used to reference the object when calling one of the ActiveX functions that are provided in the Built-in Scripting Language.
The Property Pages button opens the standard window for configuring the Static Properties (if any). The layout and the options in this dialog depend on the implementeation of each ActiveX Control. Use this interface to set properties that should not be changed during runtime (fixed properties).
- Associate tags to properties of the ActiveX Control;
- Trigger methods from the ActiveX Control based on tag change; and
- Configure scripts, which are executed when Events from the ActiveX Control occur.
The following sections describe how to configure these interfaces.
The screen shots used in the following sections depict the Acrobat 3D Office control. The names of the properties, methods and events vary for each ActiveX control, but the configuration interface is the same. The concepts described here apply to all controls.
Configuring Properties
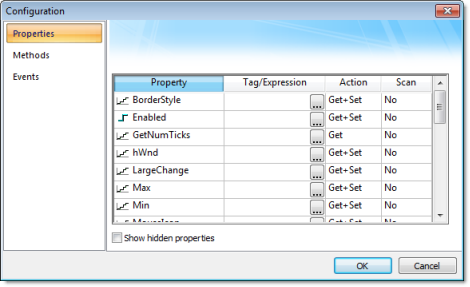
- Property: Lists all properties available from the ActiveX object, and indicate their types:
Property Icon Property Type 
Boolean 
Integer 
Real 
String - Tag/Expression: The tag configured in this field is associated with the respective property of the ActiveX object. The Action column will define whether the value of this tag will be written to the ActiveX property, or if the value of the ActiveX property will be written to this tag (or both).
Note: You can configure an expression in this field if you want to write the result of an expression to the property of the ActiveX object. However, in this case, the value of the property cannot be read back to one tag (unless you use the XGet() function). Therefore, an expression is configured in this field, the Scan field is automatically set to Set.
- Action: Defines the direction of the interface between the tag or expression configured in the Tag/Expression field and the ActiveX property, according to the following table:
Action Description Get Read the value of the ActiveX property and write it to the tag configured in the Tag/Expression field. Set Write the value from the tag or expression configured in the Tag/Expression field into the ActiveX property. Get+Set Executes both actions (Get and Set). However, when opening a screen with the ActiveX object, IWS executes the Get command before executing any Set command. That is, the tag configured in the Tag/Expression field is updated with the value of the ActiveX property when IWS opens the screen where the ActiveX is configured. Set+Get Executes both actions (Get and Set). However, when opening a screen with the ActiveX object, IWS executes the Set command before executing any Get command. That is, the ActiveX property is updated with the value of the tag configured in the Tag/Expression field when IWS opens the screen where the ActiveX is configured. Note: When the value of the property is “Read-only” (cannot by overwritten by your project), the Action field is automatically set to Get. - Scan: Defines the polling method to get values from the ActiveX propreties, according to the following table:
Scan Description No The value of the ActiveX property is read and written to the tag configured in the Tag/Expression field, only when the screen with the ActiveX object is open, and when the ActiveX object sends a message to IWS to update this tag. Always IWS keeps polling the value of the ActiveX property and updating the tag configured in the Tag/Expression field with this value.
Configuring Methods
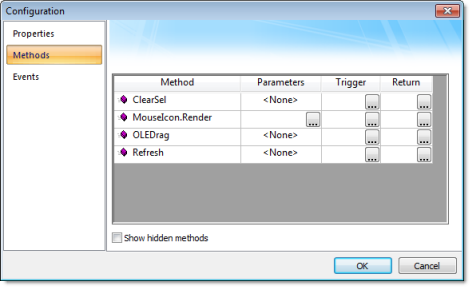
- Method: List all methods available from the ActiveX object.
- Parameters: The tags configured in this field are associated with the parameters of the method of the corresponding ActiveX object. If the method does not support any parameter, the fixed text <None> is displayed in the Parameters field. Otherwise, you can type the tags associated in the parameters of the ActiveX object. When the method has more than one parameter, you can type one tag for each parameter, separating them by a comma ( , ). For example, TagA , TagB , TagC. When the method is executed, either the value of the tags are written to the parameters of the method (input parameters), or, after the method is executed, the ActiveX writes the value of the parameters to the tags (output parameters).
Tip: When you click the Browse button (
 ), it will display the list of parameters supported by the method, allowing you to associate one tag with each parameter.
 - Trigger: When the tag configured in this field changes value, the respective method of the ActiveX control is executed.
- Return: The tag configured in this field receives the value returned by the method (if any).
Configuring Events
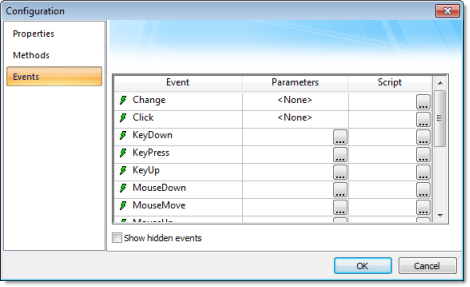
- Event: List all events available from the ActiveX object.
- Parameters: The tags configured in this field are associated with the parameters of the event of the corresponding ActiveX object. If the event does not support any parameter, the fixed text <None> is displayed in the Parameters field. Otherwise, you can type the tags associated with the parameters of the ActiveX object. When the event has more than one parameter, you can type one tag for each parameter, separating them by a comma (,). For example, TagA , TagB , TagC. When the event is generated, either the value of the tags are written to the parameters of the event (input parameters), or the parameter values are written to the tags (output parameters).
Tip: When you click the Browse button (
 ), it will display the list of parameters supported by the event, allowing you to associate one tag with each parameter.
 - Script: The script configured in this field will be executed when the event is triggered by the ActiveX control.
Tip: When you click the Browse button (
 ), it will display a dialog with the complete script associated with the event. The main dialog displays only the expression configured in the first line of the script.