.NET Control object
.NET Components are designed according to the Microsoft .NET Framework, which is a standard for modular programming technologies. Because IWS is a .NET container, you can configure and run .NET Components in your project screens. The actual functions of a .NET Component are contained within a .NET Control object, which provides the configuration dialogs.
- Properties: Variables whose values can be read and/or written for your project (e.g., Object Color, FileName, URL, and so forth)
- Methods: Functions from the .NET Component that can be triggered by your project (e.g., open a dialog, execute a calculation, and so forth)
- Events: Internal messages that can trigger the execution of expressions in your project (e.g., Mouse_Click, Download_Completed, and so forth)
The properties, methods and events supported by each .NET Component vary according to the component’s implementation.
Selecting and Placing a .NET Control Object
- On the Graphics tab, in the Libraries group, click .NET Control.
- When the .NET Framework Components dialog opens (as in the following figure), it contains a list of all .NET Components that are registered on your computer.
Figure 1. .NET Framework Components dialog

- Select a component from the list, and then click OK to place it in your project screen. You can also click the Browse… button to find an unregistered component on your computer.
Tip: Registered .NET Components are typically stored in the following directory:
C:WINDOWSMicrosoft.NETFramework
However, you can have the application include unregistered components in the .NET Framework Components dialog by editing the project_name.APP file to add this parameter:[Execution Environment] DotNetControlPath=OptionalPath
For example:[Execution Environment] DotNetControlPath=C:DOTNET CONTROLS BACKUP
Thereafter, the .NET Framework Components dialog will list all registered components and all components found in the specified directory.
- By default, a new .NET Control object is placed in the upper-left corner of your project screen. Click on the object and drag it to where you want it placed.
- Once the object is placed, double-click on it to open its Object Properties dialog.
Figure 2. Object Properties: .NET Control

The Object Properties dialog shows the name of the .NET Component. You must assign a name (alias) to the component in the Name box (e.g., CheckBox1). This name is used to reference the component when using the scripting languages (VBScript and built-in scripting).
The Property Pages button opens the standard window for configuring the Static Properties (if any). The layout and the options in this dialog depend on the implementeation of each .NET Component. Use this interface to set properties that should not be changed during runtime (fixed properties).
- Associate tags to properties of the .NET Component
- Trigger methods from the .NET Component based on tag change
- Configure scripts, which are executed when Events from the .NET Component occur
The following sections describe how to configure these interfaces.
The screen shots used in the following sections depict the CheckBox component. Although the names of properties, methods and events varies by component, the configuration interface is the same for any .NET Component. The concepts described here apply to all of them.
Configuring Properties

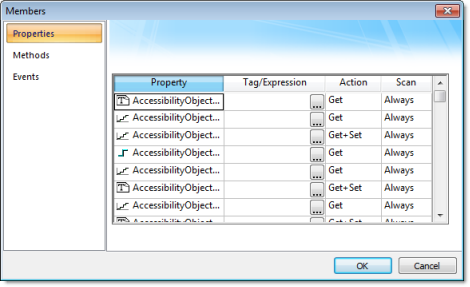
- Property: List all properties available from the .NET Component, and indicate their types:
Property Icon Property Type 
Boolean 
Integer 
Real 
String - Tag/Expression: The tag configured in this field is associated with the respective property of the .NET Component. The Action column will define whether the value of this tag will be written to the property, or if the value of the property will be written to this tag (or both).
- Action: Defines the direction of the interface between the tag or expression configured in the Tag/Expression field and the .NET property, according to the following table:
Action Description Get Read the value of the property and write it to the tag configured in the Tag/Expression field. Set Write the value from the tag or expression configured in the Tag/Expression field into the property. Get+Set Executes both actions (Get and Set). However, when opening a screen with the .NET Component, IWS executes the Get command before executing any Set command. That is, the tag configured in the Tag/Expression field is updated with the value of the property when IWS opens the screen where the .NET Component is configured. Set+Get Executes both actions (Get and Set). However, when opening a screen with the .NET Component, IWS executes the Set command before executing any Get command. That is, the property is updated with the value of the tag configured in the Tag/Expression field when IWS opens the screen where the .NET Component is configured. Note: When the value of the property is “Read-only” (cannot by overwritten by your project), the Action field is automatically set to Get. - Scan: Defines the polling method to get values from the propreties. For .NET Components, all properties scan Always by default. That is, IWS keeps polling the value of the property and updating the tag configured in the Tag/Expression field with this value.
Configuring Methods

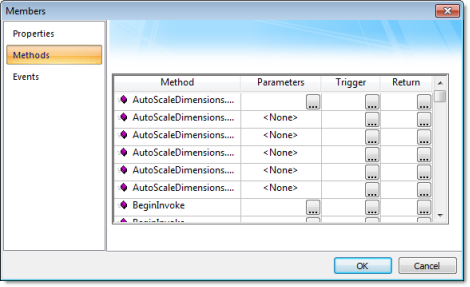
- Method: Lists all methods available from the .NET Component.
- Parameters: The tags configured in this field are associated with the corresponding method. If the method does not support any parameter, then the fixed text <None> is displayed. Otherwise, you can enter the tags that you want to associate with the parameter. When the method has more than one parameter, you can enter one tag for each parameter, separating them by a comma (,). For example, TagA , TagB , TagC.
Tip: When you click the Browse button (
 ), it will display the list of parameters supported by the method, allowing you to associate one tag with each parameter.
When the method is executed, either the value of the tags are written to the parameters of the method (input parameters), or, after the method is executed, the .NET Component writes the value of the parameters to the tags (output parameters).
- Trigger: When the tag configured in this field changes value, the respective method of the .NET Component is executed.
- Return: The tag configured in this field receives the value returned by the method (if any).
Configuring Events

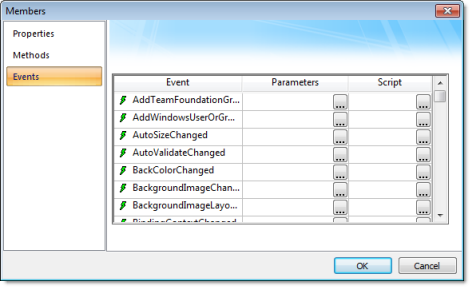
- Event: Lists all events available from the .NET Component.
- Parameters: The tags configured in this field are associated with the corresponding event. If the event does not support any parameter, then the fixed text <None> is displayed. Otherwise, you can enter the tags that you want to associate with the parameter. When the event has more than one parameter, you can enter one tag for each parameter, separating them by a comma (,). For example, TagA , TagB , TagC.
Tip: When you click the Browse button (
 ), it will display the list of parameters supported by the event, allowing you to associate one tag with each parameter.
When the event occurs, either the value of the tags are written to the parameters of the method (input parameters), or, after the event occurs, the .NET Component writes the value of the parameters to the tags (output parameters).
- Script: The script configured in this field will be executed when the event is triggered by the .NET Component.
Tip: When you click the Browse button (
 ), it will display a dialog with the complete script associated with the event. The main dialog displays only the expression configured in the first line of the script.