Ellipse object
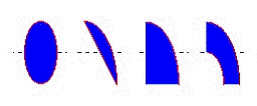
On the Graphics tab, in the Shapes group, click Ellipse to draw ellipses, chords, arcs, and rings (see the following figures).
Figure 1. Ellipse, Chord, Arc, and Ring


Tip: The Ring style is particularly useful when you are creating plumbing drawings.
To create an ellipse, use the following steps:
- Click in the drawing area and drag the mouse/cursor to create an ellipse shape.
- Release the mouse button to stop drawing the ellipse.
- Use the Object Properties dialog to change the shape to a chord, arc, or ring.
- Double-click on the object to view the Object Properties dialog.
Figure 2. Object Properties: Ellipse

Use the Object Properties dialog to specify the following parameters for the ellipse:
- Style: Specify the object style by selecting Ellipse, Arc, Chord, or Ring from the drop-down list. Next, select Left-Bottom, Left-Top, Right-Bottom, or Right-Top from the Style list to choose the quadrant into which the ellipse is drawn.
For example to represent a half-circle pipe, create two Ring objects. Specify one as Left-Bottom and the other as Right-Bottom then join the two objects to create a half-pipe.
- Line: Specify a line style for the ellipse border by clicking the No Line, Solid Line, or Dashed Line button.
- Color: Specify the ellipse borderline color by clicking the Color button to open the Color dialog. Click the color to select it, then close the dialog.
- Weight: Specify a line width for the ellipse border by typing a number representing the line width (in pixels) into the text box provided.
Note: Dashed lines/borders of weight greater than 1 are not supported in projects running on Windows Embedded.
- Fill: To specify whether the ellipse is filled, click No Fill or Fill.
If you select the Fill option, specify a fill color by clicking on the Color button. When the Color dialog displays, click on a color to select it and close the dialog.