Insert a new area in the Mobile Access tree view
Insert a new node, or “area”, in the Mobile Access tree view in order to create a new screen in the Mobile Access web interface.
The site map, so to speak, of the Mobile Access web interface is determined by the tree view on the left side of the Mobile Access Configuration worksheet. The root node of the tree, named Main, corresponds to the home screen of the web interface. If you wish, you can configure the settings for Main so that it includes all of the project tags that you want to display in the web interface. You are not required to add to the tree, and if you choose not to, you can skip this task and proceed to configuring the settings for Main.
However, if you want organize your project tags in some way — for example, by machine, by process, or by facility — you can insert additional nodes, or “areas”, in the tree view. Each area has its own settings and is represented by its own screen in the Mobile Access web interface. Areas can have as many sub-areas as you want, as many levels deep as you want. The structure of the tree view, and therefore the site map of the web interface, is entirely up to you.
Keep in mind, however, that the structure of the tree view determines how the user must navigate the Mobile Access web interface during run time. You may choose to have all of the areas together on the same level, but if you do, then the user must pan/scroll a lot to move between the areas. Alternatively, you may choose to create many levels of areas and sub-areas, but if you do, then the user must click/tap down through those levels and then back up again. In short, it is important to keep your web interface logically organized and easy to navigate, and as such you should manually outline your tree view before you begin inserting areas.
To insert an area in the Mobile Access tree view:
- Do one of the following:
- On the Project tab of the ribbon, in the Thin Clients group, click Mobile Access; or
- On the Graphics tab of the Project Explorer, double-click Thin Clients > Mobile Access.
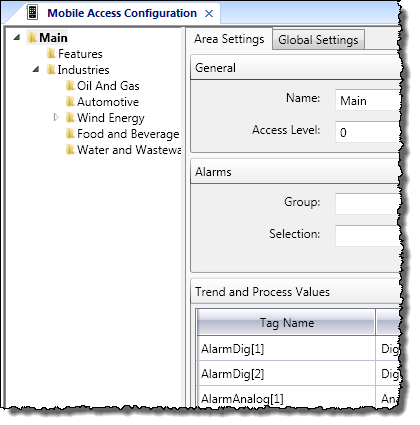
The Mobile Access Configuration worksheet is opened for editing, with the tree view displayed on the left.
Figure 1. An example of the Mobile Access tree

- Carefully determine where in the tree view you want to insert the new area, because once you have inserted it, it is not possible to move it using the Mobile Access Configuration worksheet.
- Right-click on the existing area in which you want to insert the new area, and then on the shortcut menu, click Insert Area. A New Area dialog box is displayed.
- In the Area name box, type the name of the new area, and then click Add. The new area is inserted in the tree view.
After you have inserted the new area, you can configure the settings for that area.
To delete an area that you have inserted, right-click the area, and then on the shortcut menu, click Delete Area. Please note that when you delete an area, you also delete all of the sub-areas that it contains. You cannot delete Main.
If necessary, you can manually edit this file to make changes that cannot be made in the Mobile Access Configuration tool. For more information, please contact Technical Support.